Showing posts with label Tutorial. Show all posts

Sunday, June 16, 2013

Android Commander v0.7.9.11

Android Commander v0.7.9.11 - Android Commander is windows application to keep control on your android apps and files from PC. This is a small, very very fast and intuitive app. If someone want to try it, go a head. But remember, you doing this on your own risk! I’m not professional programmer, this is only my hobby
Requirements: Android 1.6+, PC
Program Requirements: Before you install the program you should read this:
Phone Requirements:
  • ADB ROOT Access
  • BusyBox
  • Settings->Applications->Development->USB debugging” must be enabled
  • USB Cable
Computer Requirements:
  • Windows XP/Vista/7
  • ADB USB Driver
  • Java JDK
  • Minimum 800×600 screen resolution
Features:
Files Explorer
  • copy multiple files/dirs between Device and PC
  • copy multiple files/dirs between Device folders
  • delete multiple files/dirs from Device
  • drag&drop multiple files/dirs in to progrm
  • drag&drop files/dirs between program tabs
  • files/dirs properties
  • edit files/dir permissions
  • bookmarks
  • new dir and rename options
Applications Manager
  • batch/single apps install
  • install as private
  • install as update
  • install as system app
  • batch/single uinstall apps
  • uninstall system apps
  • uninstall and keep app data
  • batch/single apps backup to any dir on Device/PC
  • app details
  • search app on Web Android Market/AppBrain/AndroLib/Cyrket
  • windows integration
Search Bar
  • search apps in device Android Market
  • search location on device Google Maps
  • open URL in device browser
Device Info
  • device
  • ROM
  • partitions
  • battery
Console
  • run any shell command
  • run sh script from PC
Logcat
  • messages coloring
  • message type filter
Flashing Tool
  • flash any zip update/ROM/mod from PC
  • flash recovery/boot/system/userdata/cache image from PC
Virtual Input:
  • emulate device keys
  • send text to device text field
Signing Tool:
  • sign any zip file
  • sign any apk file
  • program explorer integration
Other:
  • reboot, reboot to recovery, reboot to bootloader, power off device
  • multi device support
  • WiFi Mode
  • No Device Mode
Whats New Version 0.7.9.11:
  • updated adb and aapt binaries
  • better work with JB
  • better updates checking system (disabled as default)
  • files and partition size display improvements
  • more fixes


Download and More Info:  Android Commander v0.7.9.11

Wednesday, May 22, 2013

MEMAKAI FLASHDISK SEBAGAI HD PS2

Seperti judul di atas, kali ini saya akan share tutorialnya dengan 2 pilahan cara, silahkan simak dan baca dengan teliti sebelum melakukan tindakan selanjutnya

Cara ke 1:
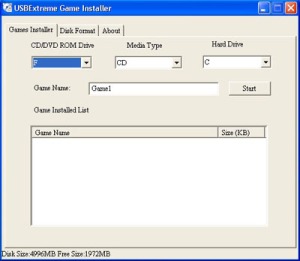
Pertama-tama hubungkan flashdisk ataupun hardisk external dengan PC, Kemudian Format keFAT32.Buka aplikasi USBExtreme Game Instaler untuk menginstal game ke flashdisk ataupun hardisk external Anda, tampilannya seperti gambar dibawah ini


Kemudian masukkan CDVD Game di DVD Rom PC, Tentukan di kolom Media Type dengan media game yang akan diinstal (CD atau DVD), di kolom Hard Drive dengan memilih Drive flashdisk maupun Harddisk external Anda, di kolom Game Name dengan mengisi nama game yang akan diinstal, jika sudah klik Start untuk mulai menginstal,

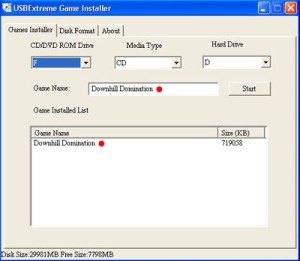
Pada contoh dibawah ini, akan diinstal game Downhill Domination dari CD Game, maka gambarnya akan seperti dibawah ini,


Klik Start untuk mulai instalasi game ke harddisk ext, maka akan nampak gambar seperti dibawah ini,


Jika instalasi sudah selesai, Klik OK, seperti gambar dibawah ini,


Maka game Downhill Domination akan masuk kedalam daftar game yang sudah diinstal di USBExtreme Instaler, seperti gambar dibawah ini,


Untuk instalasi game selanjutnya, caranya sama dengan yang diatas.

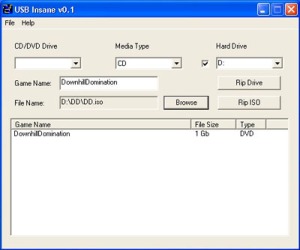
Untuk instalasi game dengan file ISO, Temen” bisa menggunakan software USB Insane, tampilan gambarnya seperti dibawah ini,


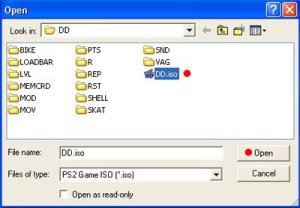
Klik File, trus pilih Open ISO, cari file ISO game yang ingin diinstal dan klik Open seperti gambar dibawah ini,


Tentukan Drive flashdisk atau harddisk externalnya, Tulis nama gamenya, jika sudah klik Rip ISO, tunggu sampai instalasi selesai seperti gambar dibawah ini,


Klik OK dan nama game yang terinstal di flash disk atau harddisk external Anda akan bertambah seperti gambar dibawah ini,


Sekarang kita akan bikin MCBootingnya,

Copy FREE_MCBOOT.ELF, BOOT.psu, dan ULE.psu, ke flashdisk.

Tancapkan Flashdisk di port USB PS2, Memory card PS2 di slot memory 1,


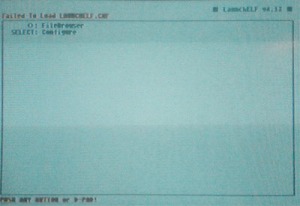
Buka aplikasi Ulaunc di PlayStation 2, dan akan tampil seperti gambar dibawah ini,


Pilih FileBrowser, kemudian tekan lingkaran, maka akan tampil gambar seperti dibawah ini,


Di gambar diatas merupakan Path” dari isi Playstation 2 Anda yang bisa Anda masuki,
  • mc0:/ merupakan path dari memory card di slot 1
  • mc1:/ merupakan path dari memory card di slot 2
  • hdd0:/ merupakan path dari harddisk yang terinstal di PS2
  • cdfs:/ merupakan path dari CDVD yang ada di CDVD Rom
  • mass:/ merupakan path dari flashdisk yang terinstal di PS2

Selanjutnya Anda instal BOOT.psu ke MMC Anda dengan masuk ke path flashdisk, pilih mass:/dan tekan lingkaran, cari dan pilih file BOOT.psu, kemudian tekan R1, dan pilih Copy kemudian tekan lingkaran, keluar ke file browser dengan menekan segitiga

Jika sudah masuk dilayar Browser, masuk ke MMC dengan memilih path mc0:/, kemudian tekanlingkaran kemudian tekan R1, pilih psuPaste dan tekan lingkaran, tunggu hingga proses instalasi selesai, keluar dari path MC dengan menekan segitiga,

Kembali ke Flashdisk, dengan memilih path mass:/ kemudian tekan lingkaran, setelah masuk di flashdisk, cari dan pilih ULE.psu, tekan R1 dan pilih Copy dan tekan lingkaran, keluar dari path flashdisk,

Di file browser masuk lagi di MC dengan memilih path mc0:/ dan tekan lingkaran, setelah masuk MC, pilih folder BOOT dan tekan lingkaran, maka Anda akan melihat file” sebagai berikut,

  • BOOT.ELF (Aplikasi Ulaunc)
  • BOOT.icn (Konfigurasi Icon)
  • CODEB9.ELF (Aplikasi Codebreaker 9)
  • HDDLOADER.ELF (Aplikasi HDDLoader)
  • icon.sys (Konfigurasi Icon)
  • LAUNCHELF (File setting dari Ulaunc)
  • USBADVN.ELF (Aplikasi USB Advance Free)


Tekan R1 dan pilih psuPaste dan tekan lingkaran, ikuti instruksi instalasinya sampai selesai.

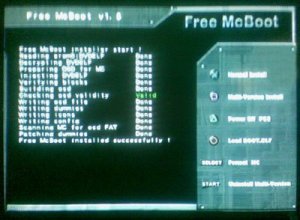
Masuk lagi di Flashdisk dengan memilih mass:/ kemudian tekan lingkaran, pilihFREE_MCBOOT.ELF kemudian tekan lingkaran, maka Anda akan masuk dimenu instalasiMCBOOT, ikuti instruksi instalasinya sampai selesai dan berhasil (tidak ada yang error), seperti gambar dibawah ini


Cabut flashdisk dan keluarkan CD jika menggunakan CD Ulaunc,

Sekarang Anda sudah berhasil bikin MC Booting Multi dengan menggunakan FREE MCBOOT v 1.5, yang mana MC Booting Multi ini sudah saya sertakan :
  • HDLoader 8b,
  • Codebreaker 9,
  • USB Advance Free,
  • uLaunchELF_v4.25.
  • Tools” lainnya
Jadi MCBooting ini bisa juga Anda pake bagi yang pengguna HD Loader sebagai bootingnya, dan bisa digunakan di PlayStation 2 yang belum atau sudah ganti chips.

Atau gunakan saja mc multi booting beserta turotialnya.

Sekarang kita akan tes Harddisk Externalnya yang sudah ada game isinya.

Tancapkan colokan USB flash disk atau harddisk external Anda di port USB PS2, masukin MC Bootingnya di port mc1, dan nyalakan PS2nya,

Jika MC Booting berhasil membaca flash disk atau harddisk external Anda, maka botingnya akan langsung masuk ke USB Advance, tapi jika tidak maka botingnya akan membaca file BOOT.ELF yang tersimpan di mc, dan botingnya akan masuk ke MC Booting multi seperti gambar dibawah ini,


Tekan lingkaran (Stik) untuk masuk ke aplikasi USB Advance, tunggu beberapa detik dan akan tampil gambar seperti dibawah ini,


Dan akan langsung membaca isi game yang terinstal diharddisk external Anda,


Pada contoh diatas, pilih gamenya dan tekan kali (Stik), tunggu beberapa detik, dan wow…. main game lagiii…

Selesai.

Berikut ini adalah Link download aplikasi-aplikasi yang di butuhkannya :


Cara ke 2

Ini alat dan software yang dibutuhkan:
  • consol ps2 (wajib)
  • flashdisk 4 gb atau hdd external kapasitas 250 gb atau lebih,format ke fat32
  • OPL 0.8 yg dapat di download di http://sksapps.com/index.php?page=hd.html
  • free mcboot 1.8b noobie package yang dapat di download di SINI
  • USBUTIL ver 2.00 full English (untuk instal game kurang dari 4 gb )
  • USB Exteme win 32 utility (untuk instal game lebih dari 4 gb ) usbutil dan usb extreme dapat di download bersama dengan link download opl…..tingal kamu cari aja …
  • UlaunchElf cd yang bisa di download di SINI

Nah sekarang cara kerjanya :
Langkah pertama:
  • Ekstrak “FreeMCBoot.zip dan OPL 0.8.zip” dan copy ke flashdisk
  • burn ulunchelf yg kamu download tadi ke CD,menggunakan image burn
  • lalu masukkan cd ulunchelf ke ps2 kamu, tungu hingga muncul beberapa pilihan, pilih ulunchelf tunggu beberapa saat sampai menu muncul,Pada menu utama tekan “O” untuk “File Browser”., Pilih “Mass:\” dan tekan “O”, kemudian pilih “FREE_MCBOOT.ELF”tekan “O”,setelah masuk menu mc boot pilih format mmc (sebaiknya kamu membackup save game kamu yang penting karena akan hilang semua setelah di format)
  • pilih normal instal lalu tunggu beberapa saat sampai proses instalasi selesai,matikan ps2 kamu ambil cd uluncdelf didalam ps2, nyalakan lagi ps2 kamu kalau proses instalasi benar maka akan muncul menu free mcboot.
  • masuk ke menu ulunchelf pilih ”mass:\” pilih opl 0.8 elf tekan R1 lalu pilih copytekan segitiga untuk kembali ke menu sebelumnya , lalu pilih mc0 tekan O,pilihBOOT tekan O pilih OPL elf tekan R1 dan pilih delete setelah opl elf sudah terhapus kembali tekan R1 dan pilih paste,bila benar maka opl 0.8 elf akan tercopy di folder BOOT, reset ps2 kamu.
  • masuk ke menu free mcboot configurator tekan O, pilih configure osdsys option, pilih configure item, tekan kanan sampai nemu tulisan opl tekan O lalu pilih”path 1” tekan O pilih “Mass:\” pilih ”boot” lalu pilih opl 0.8 elf
  • lalu return ke menu sebelumnya return lagi pilih ”safe cnf to mc 0” tunggu beberapa saat lalu pilih ” ps2 browser (fmcb restart)”.

Ok langkah lagkahnya sudah hampir selesai sekarang kamu tinggal mengistal game yang kamu inginkan ke Hdd external atau flasdisk kamu caranya
  • jalankan USBUTIL atau USB Exteme di computermu masukan dvd game ps 2 yang kamu ingin copy ke computer tunggu beberapa saat
  • bila kamu ingin mengopy game yg lebih dari 4 giga maka pakailah USB extreme, tapi sebalik nya bila kurang dari 4giga gunakan USBUTIL
  • untuk catatan buatlah folder dengan nama DVD,CD,THM,APPS,ART,VMC pada hdd external kamu bila kamu mengcopy game dvd maka masukkan ke dalam folder DVD, juga bila kamu mengcopy game yang berdisk putih masukkan ke folder CD.Ini haya berlaku bila kamu menggunakan software USBUTIL karena software ini dapat membuat file iso dari game yang kamu copy, jadi intinya folder DVD dan CD berguna untuk menyimpan iso game dari hasil copian menggunakan software USBUTIL
  • bila kamu menggunakan software USB Extreme copian akan berbentuk part part terpisah, jadi akan otomatis teristall di hdd external atau flashdisk kamu.

Ini untuk catatan : pemakaian flashdisk untuk memainkan game copyan kurang bagus, karena mempengaruhi kecepatan game, jadi saya sarankan untuk menggunakan hdd external saja, tapi saya juga tak melarang bila ingin mencoba menggunakan flashdisk, dan untuk hdd external belilah yang sudah mempunyai power suplay sendiri,di pasaran biasanya hdd external yang dijual sudah mempunyai power suplai sendiri jadi tinggal pilih,saya pribadi menggunakan hdd external 250 gb merk Bufallo…
OK teman teman itulah sedikit ilmu yang bisa saya bagi..semoga bermanfaat dan SELAMAT MENCOBA…:-))

Tuesday, May 7, 2013

T-Mobile’s Samsung Galaxy S2 (SGH-T989) official Android 4.1.2 Jelly Bean has finally arrive! The firmware build number is “T989UVMC6″ this software is now spotted on Samsung Kies firmware server, and might to roll out starting now through OTA and Kies. For those who currently runs with custom ROM and or rooted devices and for those who can’t wait much longer to try this out, you can manually upgrade your Galaxy S2 to official Android 4.1.2 Jelly Bean using the official build T989UVMC6 from the source below.

Android 4.1.2 Jelly Bean Features
  • Google Now
  • Smart Stay
  • Direct call
  • Pop-up Play
  • Nature UX Touchwiz
  • A lot better hardware performance such as camera etc.
Install Stock T989UVMC6 Android 4.1.2 JB Firmware on Samsung Galaxy S 2 SGH-T989

This method is called manual flashing by using Odin downloader and the original stock firmware, for we can’t upgrade on kies or OTA anymore after installing unofficial firmware on our devices previously.
Disclaimer: We shall not be held responsible if anything happens to your device by following this guide. Proceed at your own risk.This procedure is for advance users only, typical users may only upgrade only thru Kies or via OTA and may not use this method.

Important!
  • Back up all important files before proceeding. Although the Internal memory and microSD card are both left alone during after the flash process for this firmware is a non wipe version. But all your settings and configuration will all be reset. So, be sure to have a back up all of it for safety.
  • If your device currently runs with any custom ROM, you may ask any assistance first from your ROM developer on how to safely return back to official stock to get rid of any issues.
  • Fully recharge your phone’s battery.
  • Use Windows-based OSX PC/laptop, Odin will not work on MAC OSX
Some materials you will be needed :

  1. ODIN http://adf.ly/OYuv5
  2. USB DRIVER http://adf.ly/OYuzw
  3. Grab the Original T989UVMC6 stock ROM : http://adf.ly/Ojd2l
  4. To Root find 

Here's The Steps:
  1. Extract” or “unzip” the downloaded stock ROM to get the .tar.md5 file.
  2. Run Odin3_v3.07.exe on PC desktop
  3. In Odin - DO NOT CHECK the RE-PARTITION check box, only both ‘Auto Reboot’ and ‘F-Reset’ left checked.
  4. Click on the PDA button then browse to the folder where you extracted the stock ROM “tar file ‘T989UVMC6_T989TMB_T989UVMC6_HOME.tar.md5′
  5. Reboot the phone in download mode
  6. Once the phone in download mode screen, connect the PC USB cable To Phone. In Odin, the ID:COM box will change its color and its an indication that the device is connected properly to PC. If you still do not get any results, try another USB port on your computer.
  7. Click the Start button to begin flashing.
  8. Wait until it finishes or watch out for the word “PASS”.
To Rooting phone Step :
  1. Make sure you have Samsung Kies and Odin 3.07 (You can still use the older 1.85 version) installed.
  2. Download the Siyah Kernel S2-v6.0beta5 TAr file
  3. Turn off your Samsung Galaxy S2 and go to Download Mode by pressing Volume Down + Menu Button + Power Button at the same time.
  4. Once in Download Mode, connect your Micro-USB to your computer and load up Odin 3.07.
  5. Select PDA and find the Siyah Kernel S2-v6.0beta5 TAR file on your computer.
  6. Click Start and give it a few seconds to flash your new custom Kernel.
  7. The Phone will automatically be restarted. You will notice a Yellow Triangle and a new bootup sequence. To double check if your device has been rooted look for the CWM and SuperSU apps installed.
  8. That’s it! Welcome to the Rooted World.
*Note :
Once the phone completely reboots, perform wipe/factory reset to get a fresher firmware installation.
  1. Hold Power and Volume Up together, this will switch the device into recovery mode.
  2. Release Power after holding it for a second but continue to hold the Volume Up button until recovery menu appears.Select wipe cache
  • Select wipe dat
  • a/factory reset.
  • Select reboot
That’s all! your Samsung Galaxy S II SGH-T989 now fully installed or restored to the original Android 4.1.2 Jelly bean

Click image for larger version

Name: 1.jpg
Views: 1810
Size: 36.8 KB
ID: 1868843Click image for larger version

Name: 2.jpg
Views: 2618
Size: 30.7 KB
ID: 1868844Click image for larger version

Name: 3.jpg
Views: 1818
Size: 39.2 KB
ID: 1868845Click image for larger version

Name: 4.jpg
Views: 1710
Size: 22.1 KB
ID: 1868846

Check this one out for Samsung Latest Firmware 

Sunday, May 5, 2013

Tips dan Tutorial

Tutorial Merampok Yang benar

Sebelum menuju menu postingan untuk di Rampoook saya akan memberikan tutorial merampok yang baik dan benar menurut (Pribadi), baik tidak usah panjang lebar silahkan baca saja panduannya melalui langkah-langkah berikut :)

Langkah-langkah:

  1. Sebelum Merampok Ada baiknya Anda makan dulu
  2. Jangan lupa berdo'a
  3. Jangan lupa siapkan Kopi Hitam 
  4. Roko (Mungkin), selanjutnya 
  5. Silahkan Merampoks....
  6. Install di HH Anda
  7. Bacalah Hamdallah kalo dah selesai :)
Mohon maaf kalo masih banyak kekurangan, postingan2 tersebut Admin ambil dari Web/Blog tetangga sebelah untuk di bagikan bagi Rampok-rampok'ers sedunia maya

Enjoy...!!!
:)

Saturday, May 4, 2013


UPGRADE GALAXY FIT KE GB dan ICS

VERSI 2.3.7

Pada kesempatan kali ini, saya akan men-share postingan tentang gadget android yaitu samsung galaxy fit. Postingan saya ini berisi tentang cara mengupgrade samsung galaxy fit anda semua untuk menjadi versi 2.3.7 dengan menggunakan custom ROM cyanogenmod 7.1. mengapa saya merekomendasikan Anda semua untuk mengupgrade samsung galaxy fit anda ke versi ini? karena setelah beberapa kali percobaan dengan berbagai firmware (saya sudah sampai pada versi Ice Cream Sandwich 4.0.3), ada beberapa fitur-fitur pada galaxy fit yang tidak bisa digunakan. fitur yang paling sering tidak berjalan adalah kamera (pada versi Honeycomb dan Ice Cream Sandwich). selain itu, samsung galaxy fit hanya dapat di upgrade dari FROYO hingga GINGERBREAD. yaitu dari versi 2.2 sampai 2.3.6. Tetapi, dengan custom Rom yang akan saya share ini, samsung galaxy Anda semua dapat mencapai versi 2.3.7. kemudian, custom ROM ini menyajikan tampilan yang cukup menarik dan sederhana serta mudah dipahami bagi para pengguna newbie seperti saya. :)

Baiklah, langsung saja saya akan menjelaskan langkah-langkahnya. pertama, siapkan bahan-bahan yang diperlukan, yaitu:
1. PC / Laptop
2. Kabel USB (Sebaiknya menggunakan kabel USB asli dari samsung)
3. Odin Multidownloader
4. Clockworkmod Recovery 0.0.5
5. Firmware Cyanogenmod 7.1

Link download:
1. Clockworkmod Recovery 0.0.5. klik disini
2. Cyabogenmod 7.1 Firmware Klik disini
untuk Odin Multidownloader, saya sarankan Anda men-searching nya di google, karena lebih banyak pilihan dan update terbaru Odin Multidownloader. (^_^)
password: vio


Langkah-langkah:
  1. Install dan buka Odin Multi Downloader.
  2. Ekstrak dan letakkan file 'BENI_v1.0.ops' pada kolom 'ops'.
  3. centang kotak one packcage dan masukkan file 'GT-S5670-CWM' pada kolom 'one packcage,
  4. Aktifkan posenl dalam Download Mode dengan cara menekan tombol 'home+power+volume down' secara bersamaan
  5. Sambungkan ponsel dengan PC/Laptop dengan kabel USB dan lihat pada monitor pada kolom pertama. jika berwarna kuning, maka ponsel sudah ter-detect oleh odin.
  6. Klik 'Start' pada odin dan tunggu sampai selesai dan keluar bacaan 'PASS' berwarna biru pada odin.
  7. Setelah selesai, masukkan file zip Cyanogenmod 7.1 yang telah didownload tadi ke sd-card ponsel melalui USB Storage atau bluetooth. (sebaiknya simpan pada tempat yang mudah di temukan)
  8. kemudian, masuk kedalam recovery mode dengan menekan tombol 'home+power button'
  9. Setelah masuk dalam sistem recovery, ikuti langkah-langkah dibawah ini: 
(Fungsi Tombol: Volume Up = ke atas, Volume Down = ke bawah, Home key = Select, Power Button = Back)

Untuk langkah selanjutnya, saya rekomendasikan Anda untuk mengikuti tutorial yang saya temukan di youtube agar semakin memperjelas cara upgrade. Klik disini.

Setelah mengikuti semua langkah yang ada ditutorial, ponsel samsung galaxy fit anda akan segera berubah menjadi versi 2.3.7.
dan semua langkah ini telah saya terapkan pada galaxy fit saya dan berhasil. saya sampai sekarang masih sangat nyaman menggunakan custom ROM ini pada galaxy fit saya karena bisa dimodifikasi lebih lanjut lagi.

ICS

Prerequisites
  • Charge your device to a minimum of 90% as since the procedure is bit lengthy, the phone will consume more battery than the normal usage. Lesser battery will lead to the turning Off of the device in the middle of the firmware update process.
  • Back up all your data which is there in the phone memory, as in an unlikely event if the data gets lost then you can easily restore the backup.
  • Up next is you need to ensure that the USB Debugging is enabled in your phone. The USB Debugging can be enabled from the path of Settings > Applications > Development > USB debugging. Apart from this you also need to ensure that your computer has ADMIN privileges and USB Read / Write Access. It’s not recommended to use computers which have limited access.
Instructions For Custom ROM users

Just in case if you are on any of the custom ROMs then you need turn Off your phone so that you can then enter into the recovery mode. The recovery mode can be entered by pressing Volume UP Key + Middle button, and holding both simultaneously press the Power Button. If the device boots normally then you need to again try to enter the same.
In the recovery mode, select the options like Wipe data/factory reset, Wipe Cache partition and then select reboot system now to reboot the phone. You can select the options using the Volume keys and can select the appropriate option by pressing the Power button. This basically clears off all the cache data which is there in the phone so that the room can be made to accommodate this all new custom ROM firmwares

Procedure For Updating

STEP 1: Official Firmware Installation

First up you need to update your phone with the 2.3.x version of firmware (And not on Froyo 2.2.x). You need to follow the instructions which are mentioned below in the form of Links. Please note that it’s a base firmware and you need to install it

STEP 2:Install ClockWorkMod 5 Recovery Image

First up you need to download the beni_cwm-5_ext4_v2.tar & odin+beni.ops.zip.Extract the files and Find Odin 4.38.exe And BENI_v1.0.ops in your Extracted Folder.

Now, Switch off Your Fit And Enter into Download Mode By Pressing Power+Menu Button+Volume Down Button Until Downloading Mode Appears.Open S5670_Odin_Multi_Downloader_v4.38.exe.Place BENI_v1.0.ops on OPS tab.Check the One Package Option.Place beni_cwm-5_ext4_v2.tar on One Package tab.Connect the device to PC which you have put in Downloading Mode.Press Start and wait for flashing process is finished.

After this you will have to proceed to the next step which is mentioned Further

STEP 3:Installation Of CM 9 ICS Firmware

  1. 1First up you need to download Zip file which is mentioned below in your computer https://hotfile.com/dl/151919225/162...beta4.zip.html
  2. Now, once you are done with downloading the above file in your computer, you need to now copy the file in your phone and ensure that you are not placing these file deep into the phone. Please note that you should not modify or rename the files which you have downloaded or else there is a high probability that the file would not be supported.
  3. After this Enter in Recovery Mode by Holding Power Off + Menu Button Until Recovery Mode Appears.
  4. In the recovery mode, you will have to choose “choose zip from SD”. Now, from the list of files and paths you will need to first select the file which is named as “cm_beni-beta4.zip (or which You Have Copied to SD Earlier)”. Ensure that you select the file properly.
  5. Now, as soon as the process is over.Select Wipe Data/Factory Reset And Wipe Cache Partition.After All Done Select “Reboot System Now”
So, there you go as soon as the phone is rebooted you will see that the firmware is updated with the latest version of Android 4.0(ICS 4.0.3)...

Cusrom Links:

Tutorial Lengkapnya: